Friday, November 19, 2010
Time is Running Out!
Click here for the entry rules and pictures of the giveaway items. Good luck!!
Monday, May 31, 2010
My ABC Book!
Sunday, May 30, 2010
Beanie Bags
I'm still discovering all the ways that these can be used for playtime, but so far they are having a great time tossing them into buckets and baskets, balancing them on their heads and each other's head and stacking them up. I love that it ended up being a free project for me since everything I used was leftover from something else.
Friday, January 29, 2010
Favorite Things Friday - Newborn Gear Edition
Fisher Price Infant to Toddler Rocker

Target or Walmart Brand Infant Gas Drops
Don't let the picture fool you... we never paid for the Mylicon brand name. We went through countless bottles of gas drops in our house, and it became part of the feeding routine to give them a squirt each time they nursed. We would stock up on these bottles 4-5 at a time and definitely noticed a huge difference when we forgot to use them. The name brand is over $10 a bottle, the store brand is less than $4. We had just as effective results with the cheaper option.


Monday, September 7, 2009
Sponge Ball Square Arms
Supplies:
3 new, plain kitchen sponges
1 long piece of string
Scissors
Use scissors to cut each sponge lengthwise into 5 strips and stack them as shown below.
Loop the piece of string around the center of the stack. Try to get it as close to center as possible as this affects the look of the ball.
Pull the string tightly, double knot and then cut off the excess.
And there you have your sponge ball square arm!
Grab a friend, soak the ball in a bucket of water and have fun throwing it back and forth and getting wet in the process. This also makes a great bath toy as my toddler discovered!
Craft featured in the August 2009 issue of Family Fun magazine.
Trisha is the wife of Luke and mom to Sam (19 months). Sam especially loved this craft and thinking it looks like a "butterfly" has come to call it by that name and takes it everywhere!
Sunday, September 6, 2009
Hand/Footprint Keepsake
Scoop up those little ones and enlist their help in making this cool keepsake (and/or potential gift for those sentimental grammies and pappies out there...)
Method 1: Clay
(I like this idea better - I think there are more possibilities for color and personalization, and you don't have to worry about burning your kids!)
Purchase a wooden plaque at a craft store. This can be bought for as little as $2, depending on the size you choose. While you're there, pick up decoupage glue (or use watered down Elmer's glue) and some scrapbook paper that you want to use as the background. You'll also need Sculpty clay (either the air dry or the bake-to-dry kind is fine) and alphabet stickers for the words.
Seal the plaque with decoupage glue. Do this by painting a thin layer of glue across the whole surface. Wait for it to dry. Apply a thin layer to the back of the paper you chose and lay it on the plaque, making sure to smooth the bubbles before it dries. Wait for it to dry. Apply another layer of glue on top of the paper. Use this process for each layer you want to add, whether you layer multiple patterns of paper, use stickers to spell your child's name or leave it as a single layer.
As it dries, work the Scuplty clay into a soft ball using warm hands. Press it into a circle (for a handprint) or more of an oval (for a footprint). [NOTE: Make sure you flatten the circle or oval onto a flat surface, or adhering it to the plaque will be very difficult because it won't lay flat. I found that wax paper worked the best.] Press your child's hand or foot into the clay. If you don't like how it turns out, simply rework the clay and start again. I found that it was easiest to roll the clay out between two pieces of wax paper using a rolling pin. Depending on the clay you chose, either air dry or bake per the instructions.
Use a glue gun or Super Glue to fasten the print to the plaque. You can either fasten a hanging bracket on the back (to hang it on the wall like a picture), glue a ribbon to the back and tie it into a bow to hang like that (as shown in the Audrey example below), or buy one of those plaque stands to prop it up on a coffee table or mantle. Here's my finished project:
Method 2: Natural 'plaster of Paris'
Mix 1 cup baking soda, 1/2 cup cornstarch, 1 teaspoon salt and 3/4 cup water. Heat over medium heat until boiling, then lower the heat and stir until thick. Use the lid from a margarine tub (or cool whip, or Tupperware, etc) as a mold and spread the mixture in it. When cool, press your child's hand (or foot) into the dough to form a print. Use a paperclip to create a hole in the mold and to etch in the date and your child's name (before it dries), then string with a pink or blue ribbon.
Wednesday, August 26, 2009
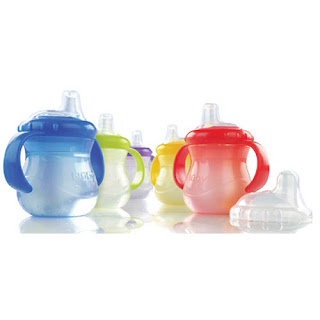
Product Review: Sippy Cups
I'm actually wondering if anyone has had good luck with a hard spout cup. Please share your experience (good or bad!)
- Price: about $6.50 for one
- Pros: Only holds about 5 oz. of fluid, so it isn't too heavy for small hands to hold up; easy grip handles; locking cap; any Nuk bottle will fit in the handles
- Cons: incredibly difficult to suck from (I even tried it and couldn't get it to work!)
- Final Verdict: Waste of money. For as difficult as it is to suck from, I can't believe any baby ever learns how to use a cup.

Nuby Flip-n-Sip Straw Cup
- Price: about $4.99 for one
- Pros: Doesn't leak when straw is contained; easy grip handles; holds 8 oz
- Cons: Confusing to babies because they have to keep the cup down to drink from a straw; difficult to clean (I'll only use water in it so milk doesn't get stuck in the cracks); won't fit in a cup holder because of the handles
- Final Verdict: These cups are fun and exciting for the boys to use. Since they have figured out the straw, they are much easier for them to use. I still wouldn't use milk in these cups, but for juice and/or water, I really like them.

- Price: about $6.50 for two
- Pros: price; soft spout
- Cons: very difficult to screw the top on (the handles get in the way and the bottom is too fat to get a good grip on); nipple collapses when baby sucks too hard; leaks
- Final Verdict: I hate this cup and would never recommend it to anyone
Nuby Leak Resistant Cup
- Price: about $4.99 for one
- Pros: soft spout makes learning easy; easy grip handles; easy to clean
- Cons: food particles get stuck in crevices when washed in the dishwasher and don't come out; very easy for babies to push nipple through the ring (which spills out all contents); because of the handles, it won't fit in a cup holder
- Final Verdict: this is usually our everyday cup, though I have to keep a close eye on the boys so they don't push in the nipple

- Price: about $5.50 for two (but even cheaper at Walmart)
- Pros: easy to clean; inexpensive; soft spout
- Cons: No handles and heaviers, which makes it hard for slippery, small hands to hold up
- Final Verdict: Now that the boys are better with cups and their hands, this is a great option